The most flexible no-code ITSM solution
Service Desk: What it is, What it Does, And How to Run One With Modern ITSM
A service desk is the first point of contact between users and IT, where people go when they need help with technical issues, service requests, or general IT support.
The purpose of a service desk is to ensure that IT services run smoothly and that users get the support they need as quickly and efficiently as possible.
The term is used to describe both the team that provides assistance and the software that helps manage and organize these interactions.
The team behind a service desk is responsible for handling incidents (like system failures or software errors), fulfilling requests (such as granting access to a tool or resetting passwords), and keeping users informed about ongoing IT issues.
The service desk team handles incidents such as system failures or software errors, processes service requests, and keeps users informed when issues affect IT services. Agents follow defined procedures to diagnose problems, escalate complex cases, and coordinate with other IT teams when needed.
The service desk software supports that work behind the scenes. It records requests as tickets, tracks progress, routes tasks to the right agents, and can automate routine actions. The platform also gives managers visibility into workloads, resolution times, and recurring issues.
Service desk vs. help desk vs. ITSM
Organizations often use the terms help desk, service desk, and IT Service Management (ITSM) interchangeably. In practice, they represent different levels of maturity in how IT support operates.
A help desk usually focuses on resolving technical issues as they appear. A service desk expands that role by managing the delivery of IT services more broadly. ITSM sits at a higher level, defining the framework that structures how those services are designed, delivered, and improved.
| Help desk | Service desk | |
|---|---|---|
| Scope | Technical troubleshooting and incident resolution. | End-to-end management of IT services and requests. |
| Main goal | Fix issues quickly and restore systems. | Deliver reliable services and improve the user experience. |
| Typical workflows | Ticket triage, incident resolution, and basic troubleshooting. | Incident Management, service request fulfillment, Knowledge Management, SLA tracking. |
| Common metrics | Tickets closed, first response time. | User satisfaction, SLA compliance, resolution time. |
Many organizations begin with a help desk model because it provides a straightforward way to handle incoming issues. Over time, support teams often need to expand their approach.
Today, companies must deliver support that meets the growing demand for speed and personalized interactions: 78% of agents observed that customers constantly seem more rushed than they used to.
In that context, the service desk becomes a natural evolution. It allows IT teams to address requests more efficiently while repositioning IT as a strategic function that supports business outcomes rather than operating only as a cost center.
If your organization currently runs a help desk, the transition toward a service desk usually involves three practical upgrades:
- Expand beyond incident resolution: Support teams begin managing structured service requests such as access provisioning, onboarding tasks, or equipment requests.
- Adopt formal Service Management practices: Processes like Incident Management, request fulfillment, and knowledge management introduce consistency and clearer workflows.
- Measure service quality, not just ticket volume: Metrics evolve to include user satisfaction, SLA performance, and the overall impact of IT services on daily operations.
The problems a service desk solves
Support issues often come from how work is handled day to day. Requests arrive through multiple channels like email, chat, and forms, with no single place to track them. That lack of centralization makes it difficult to understand workloads, priorities, or even the current status of a request.
Approval processes add more friction. Many teams still rely on email to validate access, purchases, or changes, which slows things down and leaves little traceability. At the same time, SLAs become hard to meet when deadlines aren’t clearly tracked or tied to a structured workflow.
A service desk introduces structure across these areas. It centralizes requests, standardizes workflows, tracks SLAs, and captures knowledge so teams can reuse it instead of starting from scratch each time.
You can usually spot the need for a service desk through a few clear signals:
- Chronic backlog: requests keep piling up without being fully resolved.
- High repetition: the same types of tickets continue to appear.
- Complaints about response times: users follow up frequently or escalate requests.
Service desk functions and core workflows
A service desk structures support work into a clear, repeatable flow. Each step defines how requests move from intake to resolution.
- Intake: Capture requests from all channels in one place, whether they come from a portal, email, or chat.
- Triage: Review each request, identify its type, priority, and required action.
- Assign: Route the request to the right agent or team based on skills, workload, or category.
- Fulfill: Resolve the issue or complete the request following defined procedures.
- Close: Confirm the outcome with the user and document the resolution.
- Measure: Track performance through metrics like resolution time, SLA compliance, and user satisfaction.
Within this flow, service desks handle two main types of work:
Incidents focus on restoring normal operations when something breaks. For example, an employee can’t connect to the VPN, or a business application is down. The goal is to resolve the issue as quickly as possible so work can continue.
Service requests cover standard, pre-defined services. Examples include requesting access to a tool, setting up a new laptop, or onboarding a new employee. These follow structured workflows, often with approvals and predefined steps.
Keeping that distinction clear helps teams prioritize urgent issues while handling routine requests in a consistent way.
Service desk software key features
Service desk software groups capabilities around how work is handled, improved, and measured over time.
- Ticketing system: Organizes incidents, service requests, and tasks in a structured workflow, making it easier to prioritize, assign, and track progress.
- Service Level Management: Monitors SLAs, triggers alerts when deadlines are at risk, and keeps response and resolution times under control.
Self-service and knowledge
- Self-service portal: Lets users submit requests and resolve common issues on their own without contacting support.
- Knowledge Management. Provides a shared knowledge base for both users and agents, reducing repeated work and supporting faster resolutions.
Automation and workflows
- Automation: Handles repetitive actions such as updating ticket fields (priority, category, status) based on conditions or triggering notifications or responses when events occur.
- Workflow builder: Workflows are used when a request requires a defined sequence of steps, especially when multiple people or teams are involved. A workflow models a full process, like onboarding.
Asset and context management
- Asset Management tools: Track hardware and software across their lifecycle and link them to incidents or requests, giving agents the context they need during support interactions.
Analytics and improvement
- Reporting and analytics: Deliver insights into resolution times, SLA performance, asset usage, and user feedback, helping teams identify trends and improve service delivery.
How to run a service desk with InvGate Service Management
The steps below walk through how to structure your service desk in InvGate Service Management, define how requests are handled, and set up the controls and visibility needed to manage daily operations.
Step 1: Define the help desk structure and service catalog
A service desk setup starts with two decisions that shape everything that follows: who owns the work, and what services are formally offered.
a) Help desk structure
Help desks define ownership. They group incoming requests under a responsible team before any categorization or automation is applied.
Start by identifying the main support areas in your organization and mapping each one to a help desk. The goal is not to mirror your org chart in detail, but to create clear responsibility boundaries so every request has a defined owner from the start.
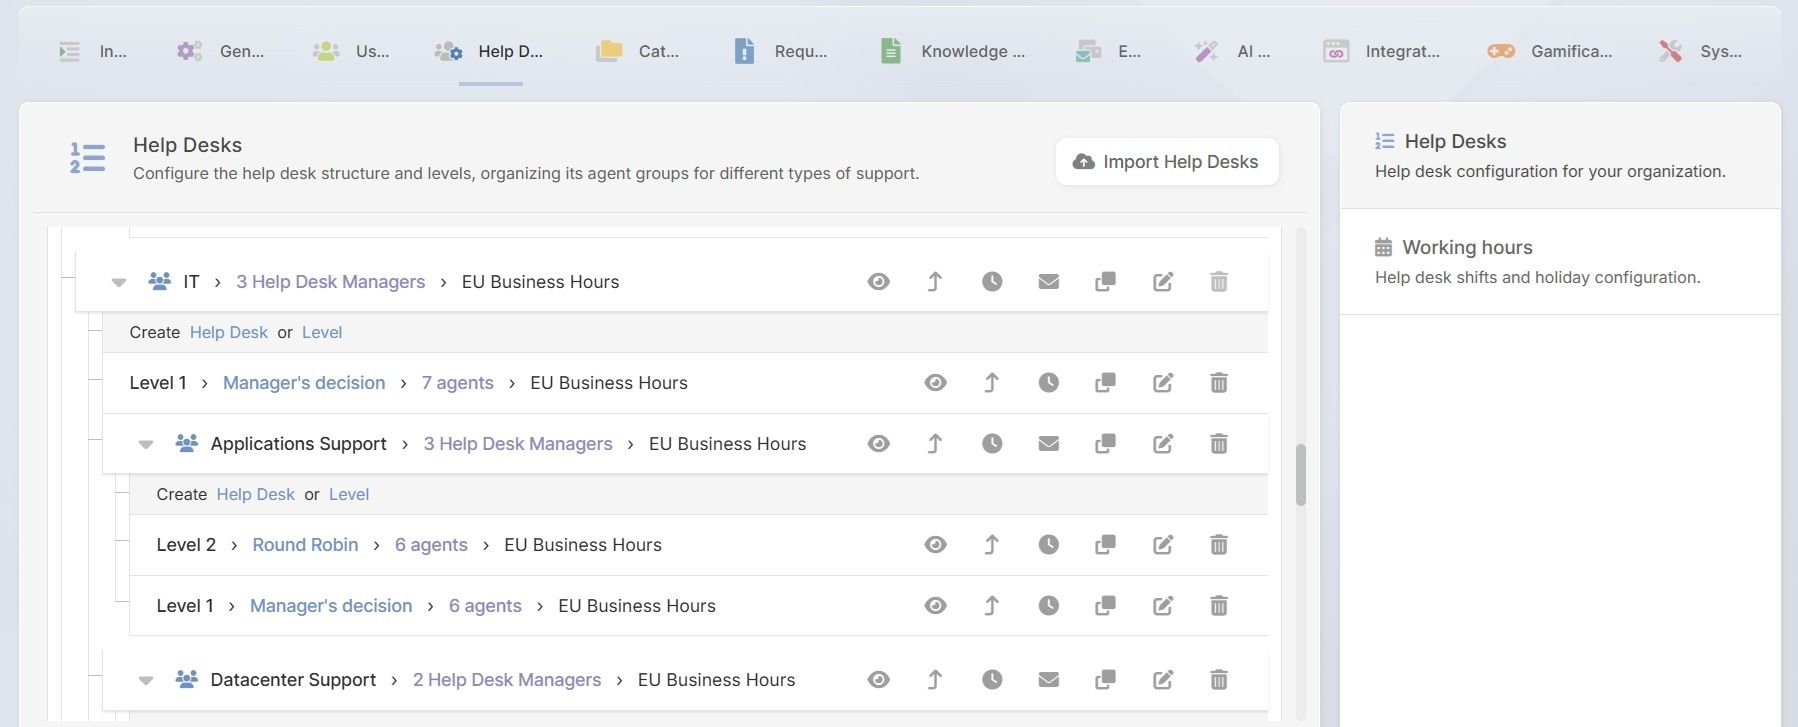
In InvGate Service Management, you configure this under Settings → Help desks. Each help desk becomes the container where requests are received and managed.
Levels sit inside a help desk and define how work is organized within that team. They represent different responsibilities or roles involved in handling requests, which can vary depending on the function. In some cases, they separate initial handling from more specialized work, but they can also reflect approval steps, coordination roles, or execution responsibilities.
For example:
- In IT, levels often separate initial request handling from more specialized technical work.
- In HR, one level can manage administrative requests while another handles sensitive cases or approvals.
At this point, you are not modeling services yet. You are defining who is responsible for handling them.
b) Service catalog structure
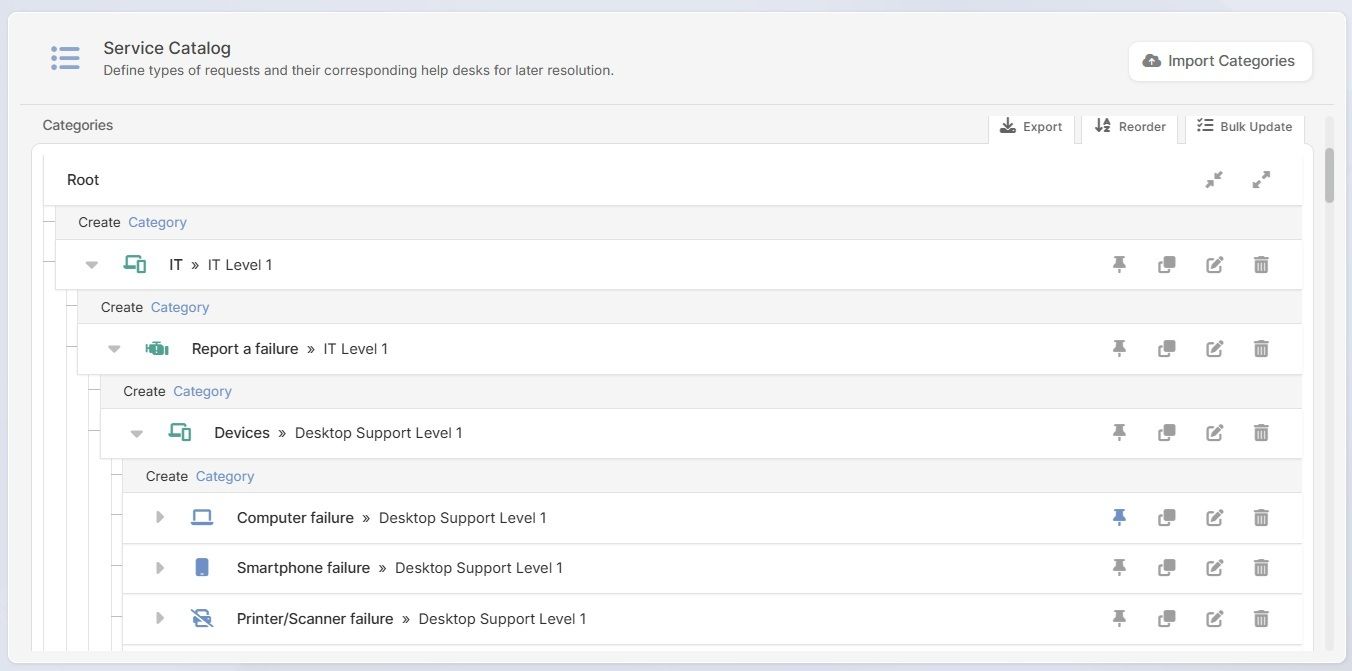
The next step is to formalize what each help desk provides. The service catalog is a structured list of request types. It acts as the reference model for categorizing incoming work.
In InvGate Service Management, you configure it under Settings → Catalog. The catalog uses a tree structure where each level refines the request:
- Top-level categories represent broad domains (for example, IT, HR, Facilities)
- Mid-level categories group related request types within that domain
- Final nodes represent the actual request items that will be submitted and processed
Each node in the tree can be assigned to a help desk and, optionally, a level within that help desk. That means the catalog is not only descriptive — it also drives routing.
A simplified example:
- IT → Access → Request system access
- HR → Employee changes → Update personal information
- Facilities → Maintenance → Report issue
Each final node defines a concrete service and points to a specific help desk. When a request is created under that category, ownership is already resolved based on the structure you defined.
At this stage, the catalog should answer a precise question: what can users request, and which team is responsible for each request type.
c) Define roles and permissions
Before or alongside your help desk setup, you’ll need to define who can access and act on requests.
In InvGate Service Management, this is handled through user types, roles, and permissions:
- User types define whether someone works on requests (agents) or only submits them (end users).
- Roles group permissions, such as Administrator, Manager, or Agent.
- Permissions are assigned to each role and control what they can see and do across tickets, queues, and configuration.
You configure this under Settings → Users → Roles and permissions. In most cases, predefined roles are enough to get started, and you can refine them later if needed.
You can also restrict access at the help desk level when handling sensitive information. For example:
- An HR help desk can limit ticket visibility to HR members and the employee who submitted the request
- A Legal or Finance help desk can prevent other teams from accessing confidential request details
When this setting is enabled, only assigned members can view full ticket content, while others may only see limited information or nothing at all.
Step 2: Set up the self-service portal and request entry points
At this point, you have already defined what users can request (service catalog) and who owns it (help desks). Now you make those services available and define how requests enter the system — while also reducing how many need to be created.
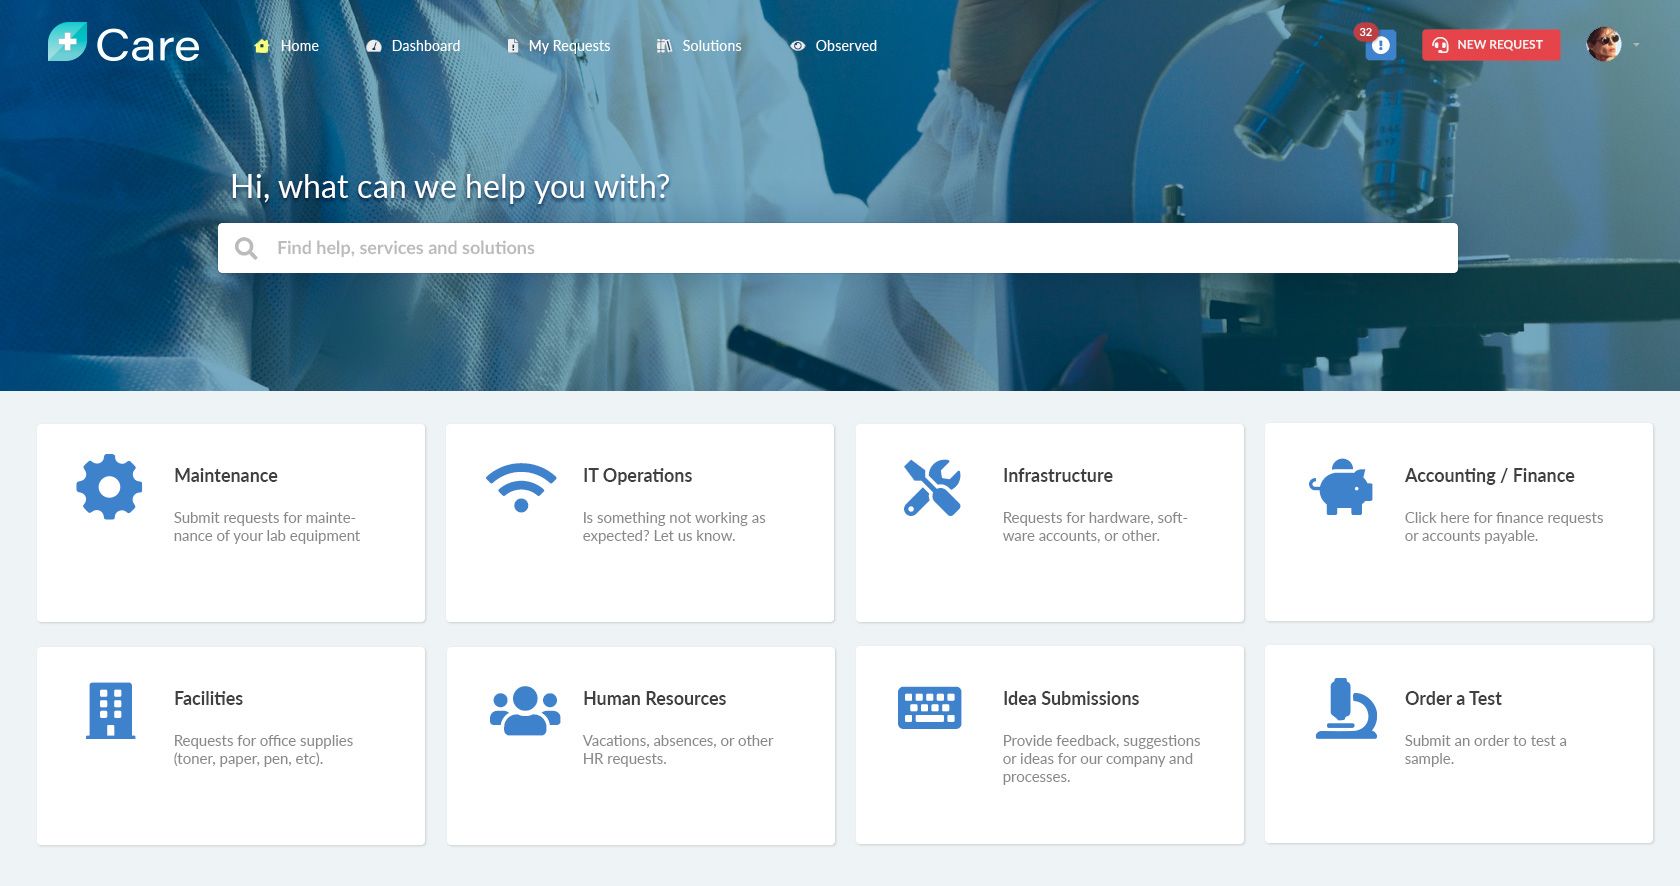
a) Configure the self-service portal
The portal is the main entry point. What you defined in the service catalog becomes the set of options users see. Categories and request items are presented based on visibility rules, so each user only accesses what is relevant to them.
You can also highlight or pin common requests to make them easier to find, reducing friction for high-volume use cases.
The portal also provides request tracking. Users can check status, view updates, and follow progress without needing to contact the help desk.
b) Build a knowledge base
The portal should not only collect requests — it should help avoid them when possible.
Build a knowledge base with articles based on recurring issues and resolved tickets. Then associate those articles with catalog categories or specific request items.
When users search or start a request, they can see related guidance that may solve the issue immediately. For example, a password reset request can show an article with step-by-step instructions so the user can resolve it without submitting a ticket.
c) Define request entry channels
In addition to the portal, you can enable other entry points that connect back to the same model:
- Email: Incoming emails converted into tickets and mapped into the catalog
- Virtual Service Agent (VSA): Conversational interface for guided request creation and support.
The Virtual Service Agent extends self-service through chat. It runs in the portal and can also be deployed in channels like Microsoft Teams or WhatsApp.
Users describe what they need in plain language, and the VSA:
- Suggests relevant knowledge base articles.
- Helps them find the right request type.
- Guides them through request creation when needed.
In many cases, users get what they need without submitting a ticket. The goal across all entry points is consistency. Different channels, same underlying model.
Step 3: Configure request assignment and escalations
The next step is to define how requests move between teams and agents. This includes how requests are assigned and how they escalate when needed.
a) Define assignment rules within help desks
Requests don’t just need an owner at the help desk level — they also need to be distributed among agents.
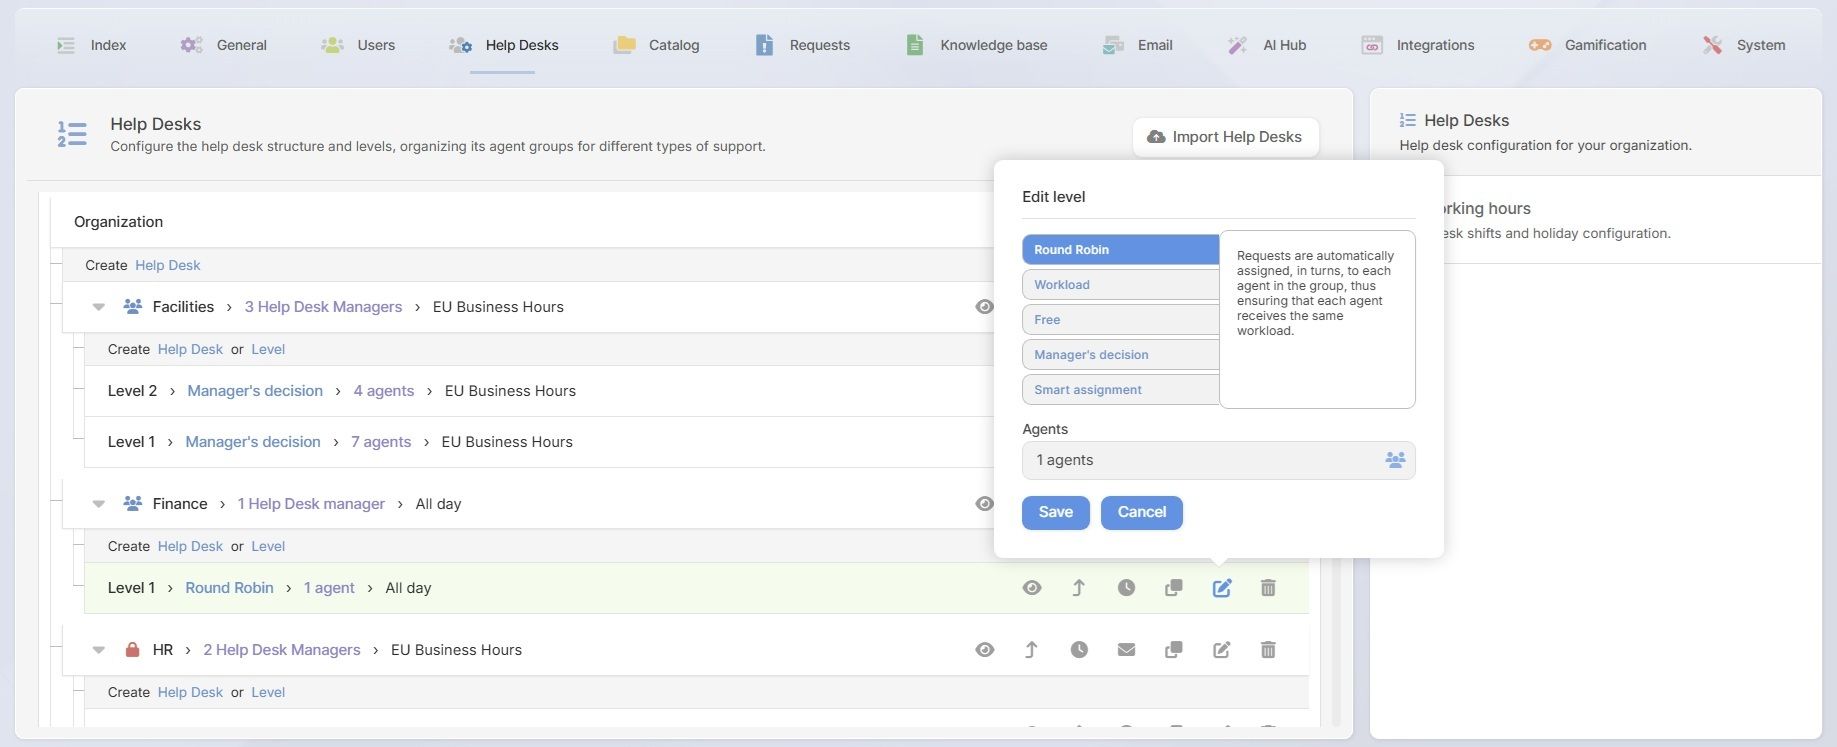
In InvGate Service Management, assignment is configured at the level within each help desk. Each level can use a different allocation method depending on how the team works.
To configure this: Go to Settings → Help Desks and click the edit icon on a level.
Available assignment methods include:
- Round Robin: Distributes requests evenly across agents in a rotating order.
- Workload: Assigns requests based on the current number of open tickets per agent.
- Free: Agents manually pick up requests.
- Manual: Managers assign requests directly.
b) Configure escalations
At this point, you have already defined your help desk structure in Step 1, including how desks and levels relate to each other. That structure determines the default escalation path.
Requests will move across help desks or levels based on that hierarchy when escalation is needed, without requiring additional configuration.
If you need to adjust that behavior, you can review and tweak it. Go to Settings → Help Desks and click the escalations icon (arrow pointing up). From there, you can refine how requests move within the structure you already set.
c) Define routing exceptions from the service catalog
Not all requests should follow the default assignment or escalation path. In some cases, you’ll want to route them differently from the start.
You can configure these exceptions directly in the service catalog: Go to Settings → Catalog → edit a category → open the Rules tab.
From there, define conditions based on attributes such as:
- Priority
- Requester (for example, VIP users)
- Location
These rules override the default help desk or level assignment. For example, a high-priority request can be routed directly to a higher support level instead of following the standard path.
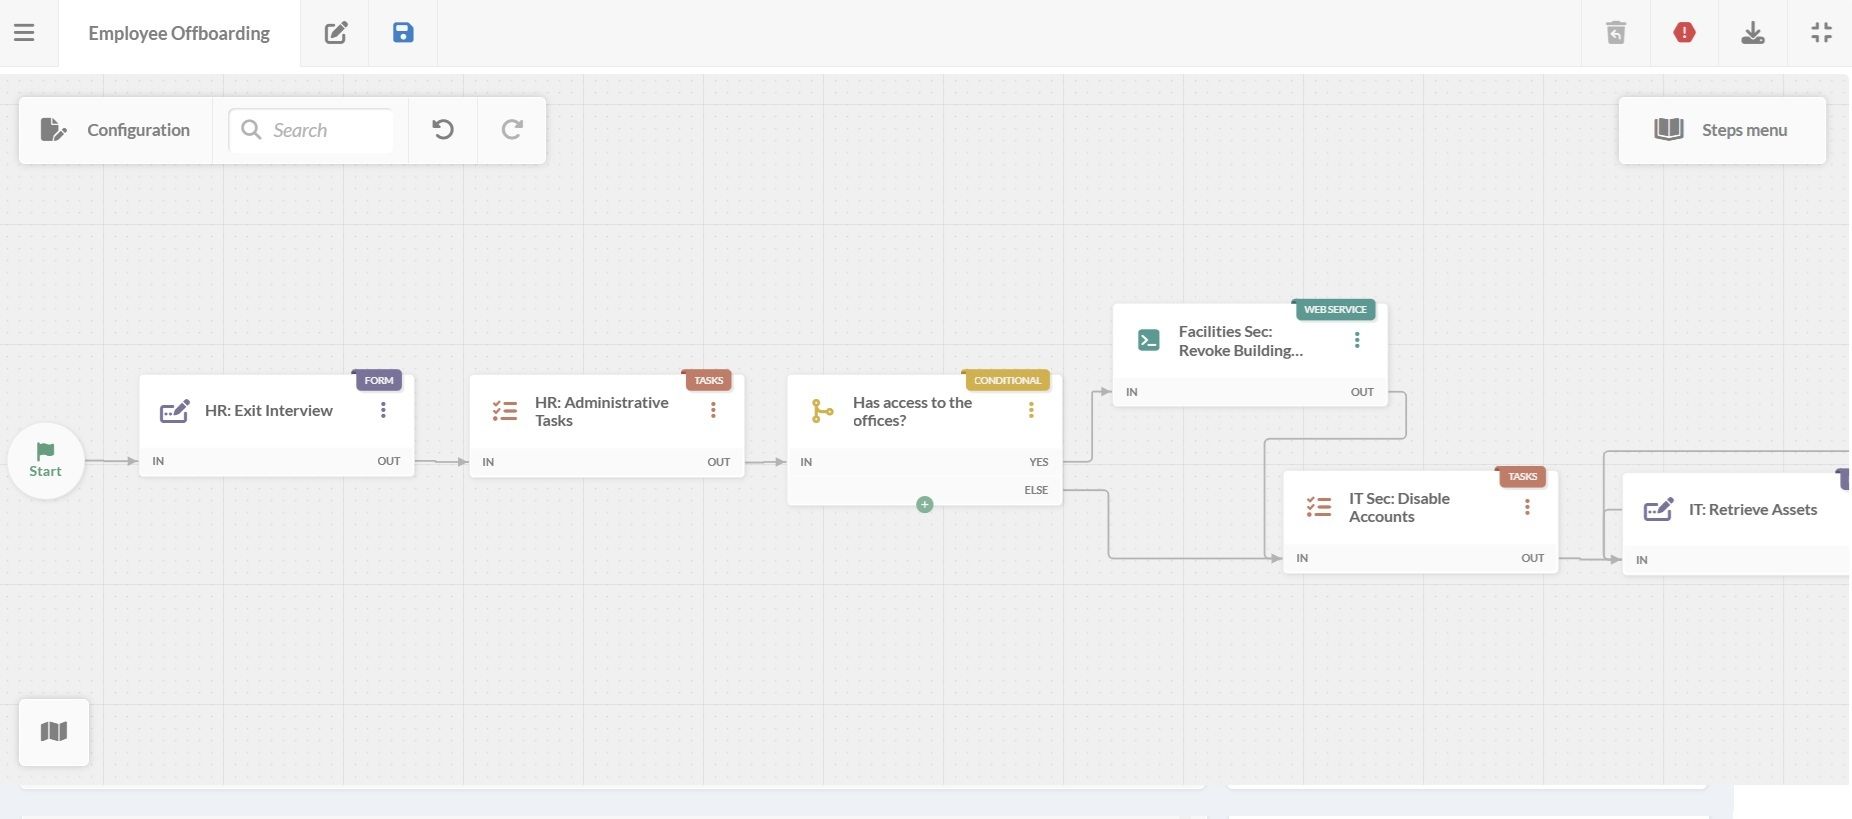
d) Use the workflow builder for complex processes
You can also assign specific catalog items to a workflow instead of a help desk. This is useful for requests that require multiple coordinated steps or approvals. InvGate Service Management’s no-code workflow automation lets you model these processes visually. You can define:
- Sequential or parallel steps.
- Approvals and decision points.
- Task assignments across different help desks or roles.
- Automated actions in external tools.
- Conditions that determine how the request progresses.
This is especially useful for scenarios like onboarding, procurement, or access requests, where work needs to move across teams in a controlled way.
Step 4: Define SLAs
Once assignment and escalation are in place, you can define how quickly requests should be handled.
SLAs set response and resolution targets for different types of requests. They make service expectations explicit and measurable.
To configure them, go to Settings → Requests → SLA.
SLAs are not one-size-fits-all. You define when they apply using conditions, so different types of requests can have different expectations.
You can base them on:
- Help desk
- Category or service
- Priority
- Location
- Client type
Conditions can be combined, so an SLA only applies when all criteria are met. For example, a high-priority request in a specific help desk can have stricter response and resolution times than a standard request.
You can also attach actions to SLAs when different time thresholds are reached, such as notifications or reassignments, so teams can react before deadlines are missed.
InvGate Service Management also includes an AI-powered SLA risk detection feature, which identifies requests that are likely to miss their targets in advance, giving teams time to intervene.
Step 5: Set up dashboards and reports for visibility
At this stage, requests are structured, routed, and controlled. Now you need visibility into how the service desk is performing.
Dashboards and reports serve different purposes, but they work together.
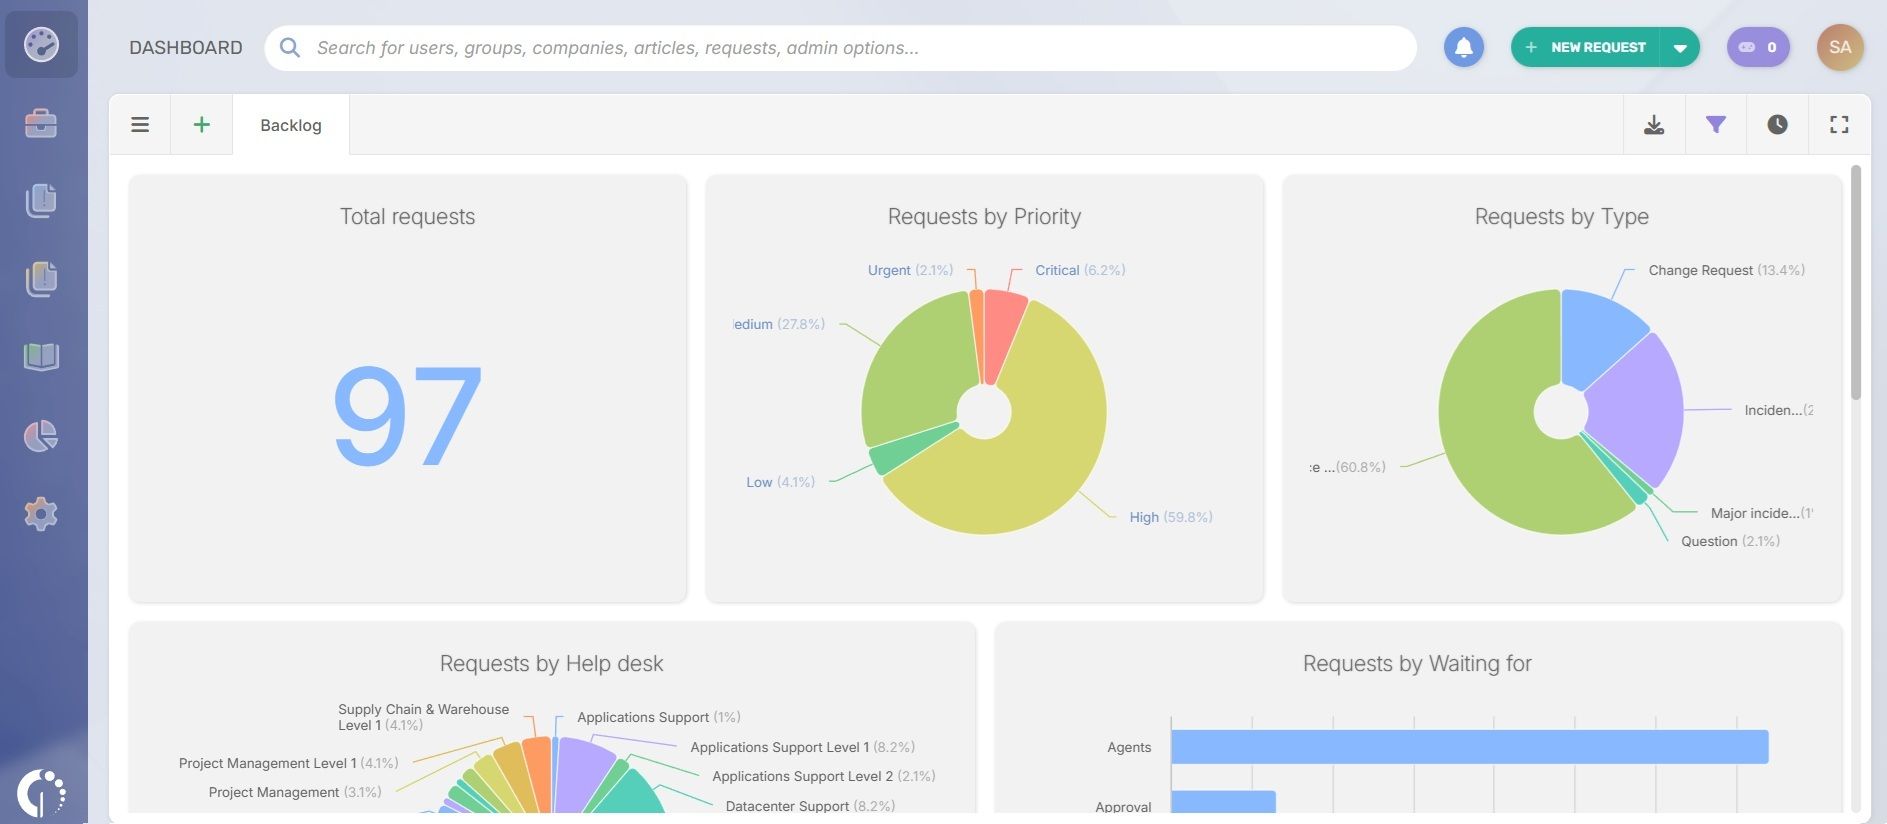
a) Use dashboards for daily control
Dashboards help you understand what’s happening right now and where attention is needed. In InvGate Service Management, you can use predefined dashboards or create your own.
Start with core metrics such as:
- Ticket volume
- Backlog
- SLA compliance
- Workload distribution
These indicators show how the service desk is performing day to day. From there, you can drill down to identify delays, overloaded teams, or services that consistently miss targets.
Dashboards are interactive and customizable. You can tailor them to each role and share them with other stakeholders for a shared view of operations.
b) Use reports for analysis over time
Reports provide a detailed snapshot of performance over a specific period. They are better suited for analysis, tracking trends, and supporting decisions.
To create them, go to Reports → Requests and define the metrics and date range.
You can build reports on:
- Request metrics and SLA performance
- Time tracking
- Ticket status over a time interval
Reports can be saved, shared (even with non-licensed users), and scheduled for periodic delivery.
To see each configuration in more detail, explore the product tour, and if you want to put it into practice, start a free trial and set up your own service desk in a live environment!
Service desk metrics to track (and why they matter)
Tracking the right metrics helps you understand how your service desk performs and where to act next. Each one should point to a decision, not just a report.
| Metric | What it tells you | What to do next |
|---|---|---|
| First response time | How quickly users get an initial reply after submitting a request. | Adjust staffing, improve routing rules, or add automation to reduce wait times. |
| Resolution time | How long it takes to fully resolve a request or incident. | Identify bottlenecks, refine workflows, or improve knowledge resources to speed up resolution. |
| SLA compliance | Percentage of requests resolved within agreed timeframes. | Revisit SLAs, rebalance workloads, or prioritize high-impact requests more effectively. |
| Ticket volume | Number of incoming requests over a given period. | Plan capacity, detect demand spikes, or identify areas that need self-service options. |
| Backlog size | Number of unresolved or pending tickets. | Reassign resources, clear aging tickets, or review prioritization criteria. |
| First contact resolution (FCR) | How often requests are resolved in the first interaction. | Improve agent training, expand the knowledge base, or refine ticket categorization. |
| User satisfaction (CSAT) | How users rate their support experience. | Identify weak points in communication or resolution quality and adjust processes. |
Service desk best practices (for scaling)
To ensure consistent quality and efficiency, there are service desk best practices to follow that can help deliver better support:
- Use a ticketing system: Every request or incident is tracked through a ticket, ensuring issues are recorded, monitored, and resolved in a structured way.
- Establish clear Service level agreements (SLAs): SLAs define the expected timeframes for resolving different requests, ensuring transparency and accountability.
- Focus on first contact resolution: The faster an issue is resolved, the better. Prioritizing solutions at the first point of contact boosts efficiency and customer satisfaction.
- Offer multi-channel support: Employees should be able to contact the service desk through various means — whether by phone, email, chat, or a self-service portal.
- Proactive communication: Keeping users informed of issue statuses helps manage expectations and build trust with the IT team.
Scaling a service desk often leads to a broader question: when should these practices extend beyond IT?
Expansion into Enterprise Service Management (ESM) makes sense when other teams — such as HR, Facilities, or Finance — start managing requests with similar patterns: approvals, repeatable workflows, and service delivery expectations.
At that point, using the same structure across departments improves consistency, reduces tool sprawl, and gives the organization a unified way to manage internal services.
FAQs
What’s the difference between a service desk and a help desk?
A help desk focuses on resolving incidents and user issues. A service desk covers a broader scope, including service requests, processes, and alignment with business services.
What does a service desk do in ITIL?
In ITIL, the service desk acts as the single point of contact between users and IT. It manages incidents, service requests, and communication across the service lifecycle.
What features should service desk software include?
Core features include ticketing, a service catalog, automation, SLA management, and reporting. Knowledge base and self-service capabilities also help reduce request volume.
How do SLAs work in a service desk?
SLAs define response and resolution targets for requests based on conditions like priority or service type. The system tracks these targets and triggers actions if they are at risk.
What metrics should a service desk track?
Common metrics include ticket volume, backlog, SLA compliance, resolution time, and workload distribution. These help monitor performance and identify areas for improvement.
Read other articles like this one:
