How to organize IT support for multiple locations
When your organization operates across several sites, support can quickly become fragmented if requests are handled differently in each place. A structured process makes support more consistent and efficient, no matter where employees are located.

With InvGate Service Management, you can centralize communications, configure location-specific help desks, and set rules that match each site’s needs.
#1. Configure help desks for each location
Each site has different infrastructure, people, and priorities. Creating a help desk per location keeps operations clear and avoids overlap.
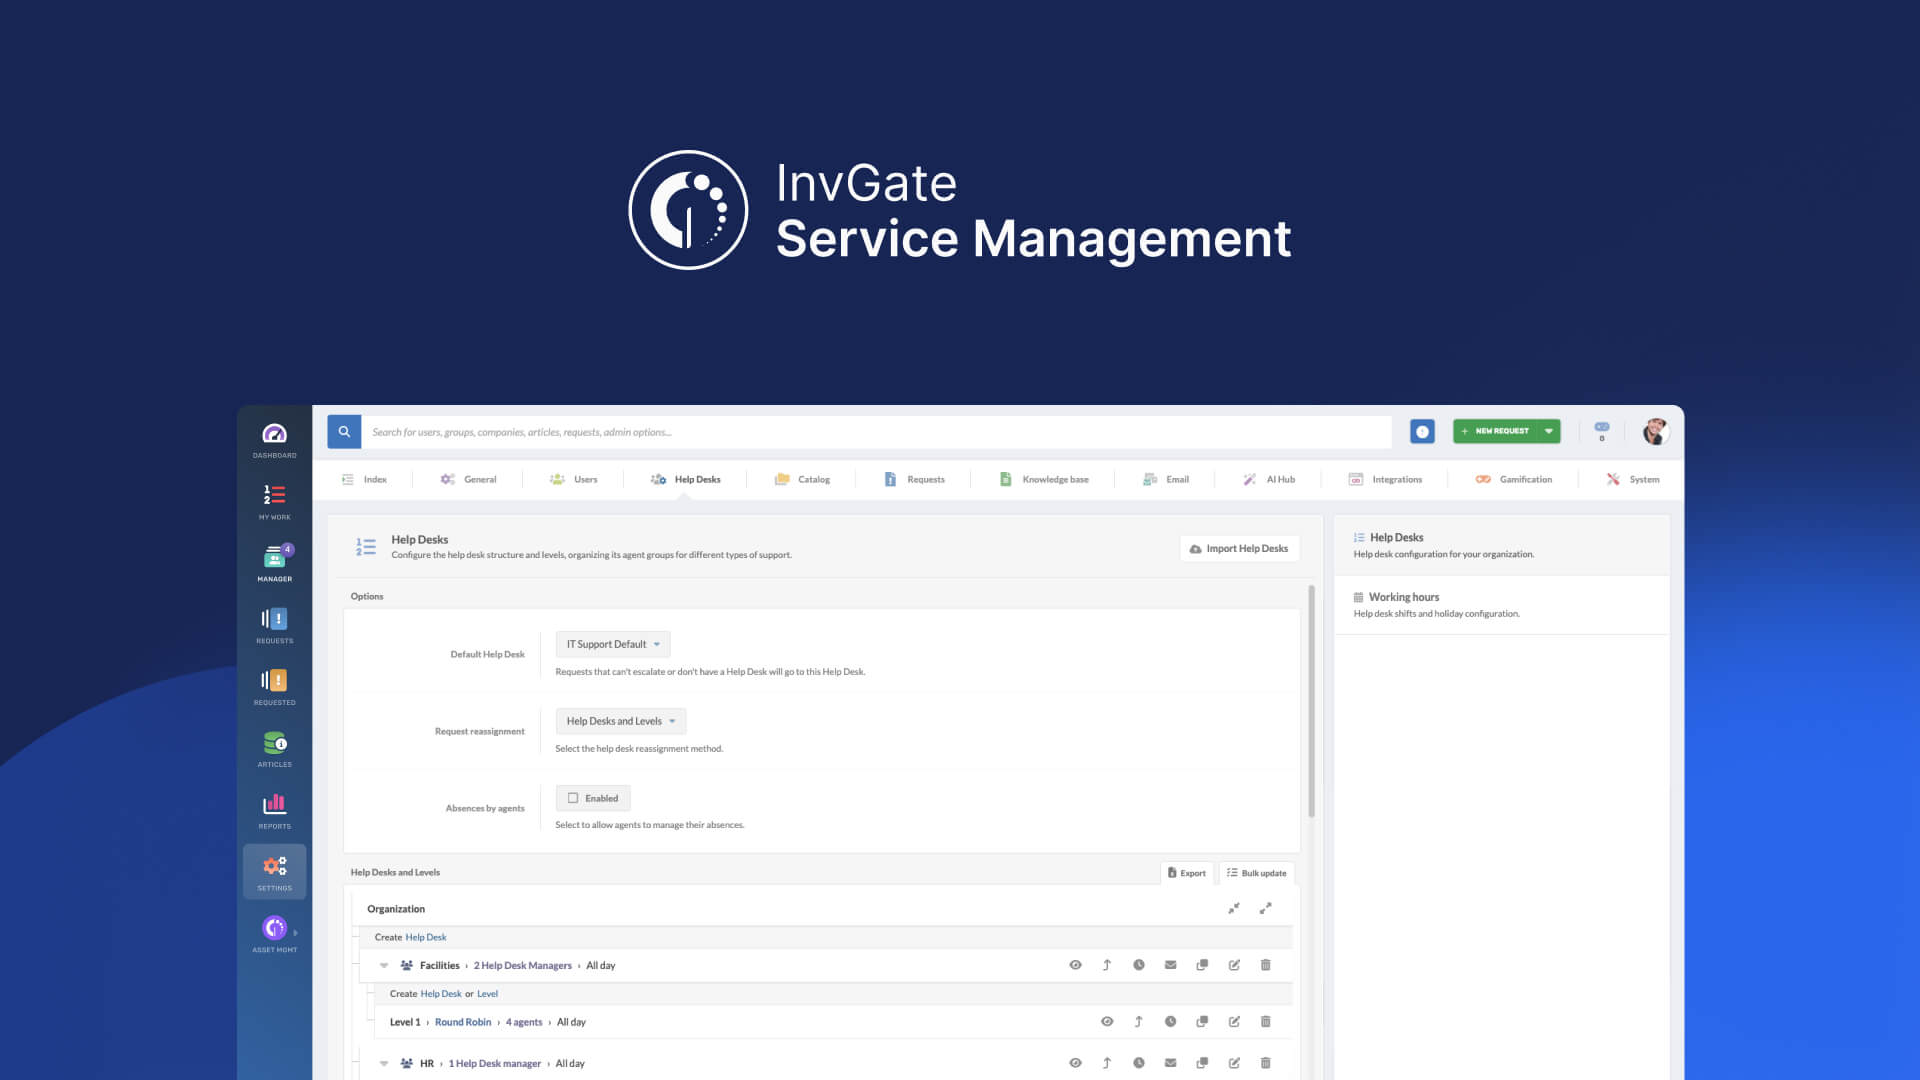
When setting up multi-location support, the foundation is deciding how to structure your help desks and levels. Think of a help desk as the team that provides service (e.g., “New York IT Support” or “Argentina HR”), and levels as the tiers inside that team (Level 1, Level 2, specialists, etc.).
Together, they create a hierarchy that defines who handles requests, how work escalates, and what visibility different groups have.
1. Structuring your help desks’ hierarchy
- Help desks by location: Create one help desk per site so each can have its own calendar, time zone, and set of agents. This avoids confusion when requests need to be resolved within local hours.
- Levels within help desks: Break down each help desk into levels that reflect your escalation model. For example:
- Level 1: Generalist agents who handle common issues.
- Level 2: Specialists for complex technical problems.
- Level 3: Senior staff or external vendors for escalated cases.
- Hierarchies and sub-desks: If needed, help desks themselves can be organized under parent desks. For example, a global IT help desk could include sub-desks for each regional office. Requests flow upward: if one desk or level cannot resolve an issue, it escalates according to your defined structure.
2. Creating help desks in InvGate Service Management
- Log in as an administrator and go to Settings > Help Desks > Help Desks.
- Click Create help desk and complete:
- Name (e.g., “New York IT Support”).
- Parent help desk, if this should sit under a global or regional desk.
- Manager who oversees activity and organizes agents.
- Restricted access to make tickets private (useful for sensitive areas like HR).
3. Creating levels and escalation paths
Once the help desk is ready, you can build its levels:
- Select the help desk, then click Create level.
- Configure:
- Name (e.g., “Level 1 – General Support”).
- Assignment method: Round robin, workload-based, free selection, or manager-assigned.
- Associated agents, who will receive tickets at that level.
- Observers, who can view but not act on tickets.
- Escalation rules, so unresolved requests move automatically to the next level.
- Repeat for as many levels as your escalation model requires.
#2. Centralize communications in one platform
While employees will naturally reach out through scattered channels — email, Slack, phone calls, etc. — the key is bringing all these conversations into your central support platform.
You can either chase requests across multiple disconnected systems (which adds significant complexity, especially in multi-site operations), or meet employees where they are while still consolidating everything behind the scenes.
The best approach allows people to contact you through their preferred channels, then automatically routes or integrates those requests into your unified ticketing system.
There are two key ways to bring requests into InvGate Service Management automatically:
- Email integration: Any message sent to your configured mailbox becomes a ticket. To set it up, go to Settings > Email > Incoming Email. You can add an email account, assign a default category like “Report a problem,” and even choose the default priority.
- Virtual Service Agent (VSA): Employees can request help directly from tools they already use, like Microsoft Teams or WhatsApp. The VSA can:
- Suggest solutions from the knowledge base.
- Create a ticket if the answer isn’t available.
- Let employees check the status of their requests in real time.
To set it up, go to Settings > Integrations > Applications.
If you rely on Slack or any other channel, you can still extend your support reach with integrations through our API or Zapier.
#3. Offer self-service capabilities
Support teams can't always respond immediately when organizations operate across multiple sites or time zones.
A self-service portal and a knowledge base bridge that gap by giving employees 24/7 access to resources, regardless of location. It reduces pressure on agents, improves response times, and provides employees with consistent support.
- Self-service portal: Go to Settings > General > Portals and scroll down to “Self-service.” Here, you can customize the employee-facing portal with your company’s logo, brand colors, and welcome message. Highlight the most frequent request categories (e.g., “Access requests” or “Equipment”) and pin knowledge base articles or FAQs.
- Knowledge base: A searchable knowledge base gives employees direct answers to recurring questions, such as “How to connect to the VPN” or “How to request time off.” To set it up, go to Settings > Knowledge Base. There, you can:
- Define categories to organize articles by what users want to achieve (e.g., IT → Applications, HR → Benefits).
- Set visibility (public for all employees or private for agents/managers).
To start creating articles manually, go to the Articles section on the sidebar and click the add button. You can also generate knowledge articles automatically from closed tickets with AI to save time.
#4. Personalize SLAs according to the locations and business areas

Not every location or business unit works under the same conditions. Some offices have larger teams, others face recurring issues in certain categories, and support hours can vary across time zones. These differences directly affect SLA performance, so using a single global policy often leads to unrealistic targets.
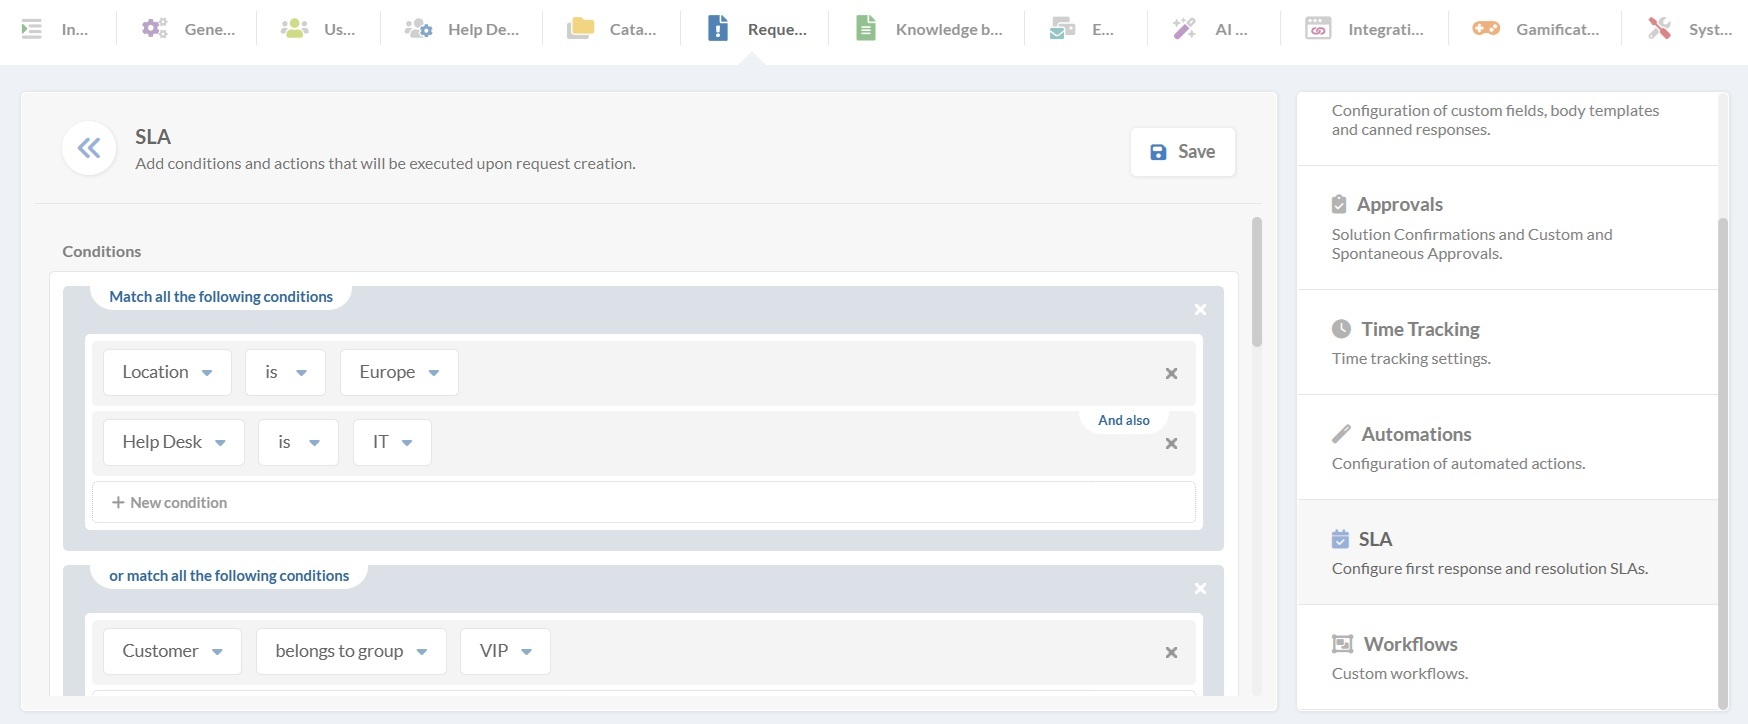
A multiple SLA policy allows you to adapt agreements to the needs of each help desk or business area. Here’s how to do it:
- Go to Settings > Requests > SLA. Here, you’ll find separate sections for “Resolution” and “First Response SLAs.” In your chosen category, click Add.
- Set the condition:
- “Help desk IS” and select the help desk this SLA applies to.
- “Location IS” and select the location for which the SLA will apply.
- If needed, add other groups of conditions, such as “Client type” or “Priority”, to fine-tune the policy.
- Define the policy details:
- Subject.
- Expiration time.
- Pausing criteria (based on help desk schedules or custom rules).
- Evaluation changes (to reassess SLA if the request changes).
- Log time and visibility of expiration for end-users.
You can also define time-based actions that keep requests moving, such as notifying managers when SLAs are close to expiring, reassigning the request, or changing its category/priority, and more.
#5. Integrate your help desk with IT Asset Management
Managing IT support across multiple locations requires a unified view of your assets. InvGate Service Management integrates with InvGate Asset Management, allowing you to link configuration items (CIs) directly to requests. This helps agents quickly identify which assets are involved, track their status, and resolve issues faster.
To set up the integration, go to Settings > Integrations > Asset Management. From there, you can connect the platforms using the provided API credentials. Once configured, you’ll be able to:
- Automatically associate requests with the relevant assets.
- Track the lifecycle and status of devices, software, and other CIs.
- Give end-users accurate information about the assets they’re requesting support for.
- Access Asset Management directly from the Service Management interface.
#6. Enable help desk workflows to automate manual processes

Supporting IT across multiple locations can create bottlenecks when requests involve several tasks, like approvals, checks, or asset updates. Workflows help standardize and automate support processes, ensuring no step is missed and every request follows the correct procedure.
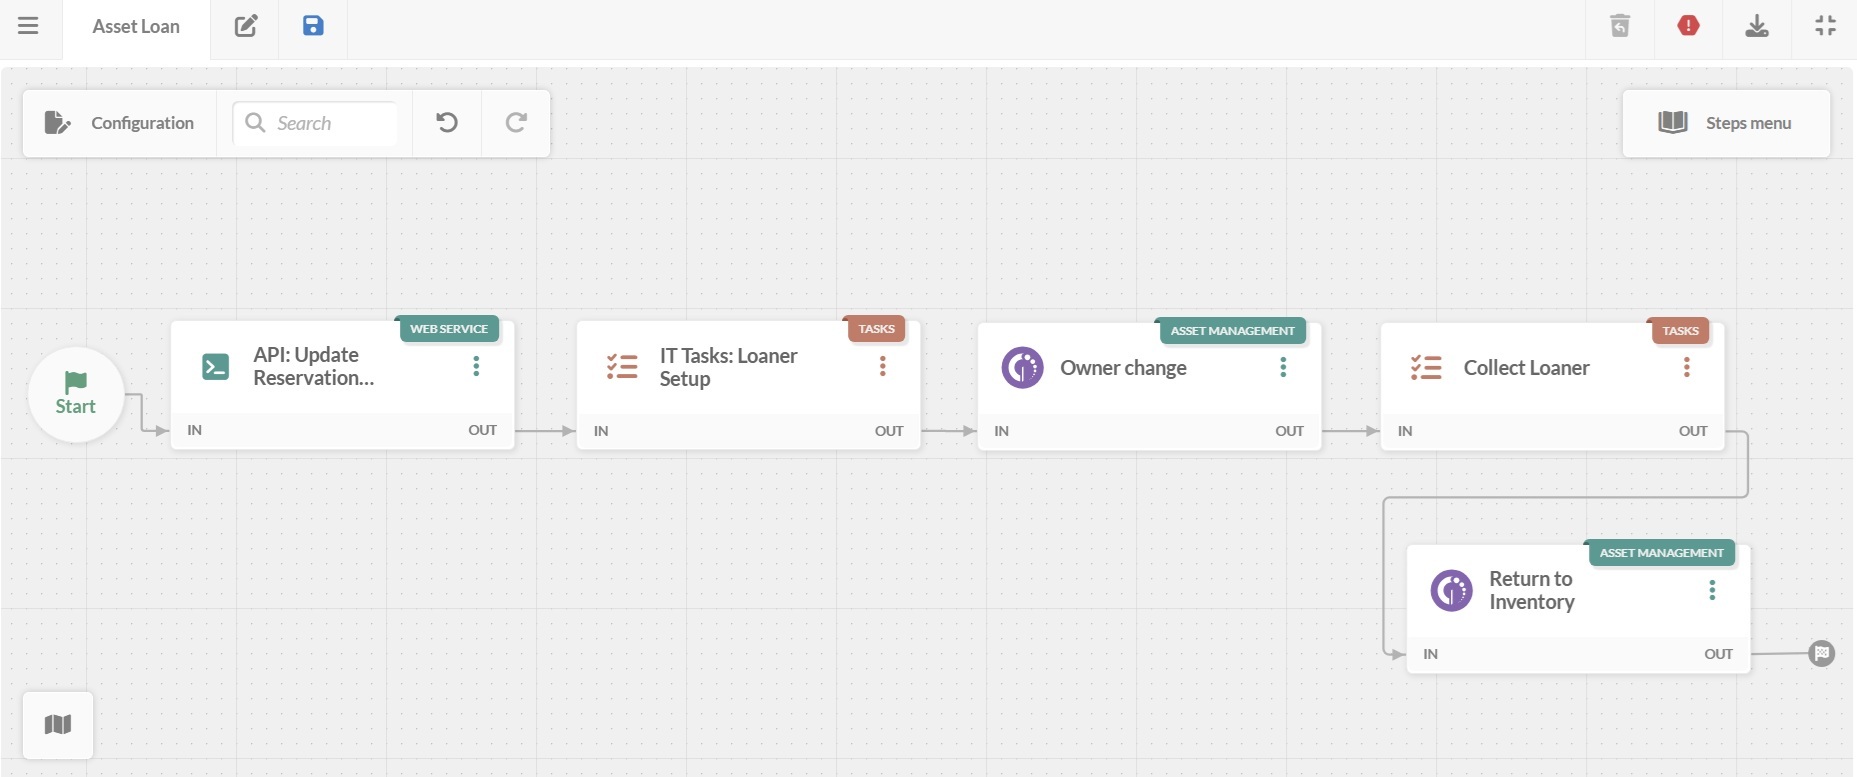
InvGate Service Management has a no-code workflow builder, so you don’t need a development team to implement them. To create workflows:
- Log in as an admin and go to Settings > Requests > Workflows.
- Click Add to open the diagram editor.
- Build your workflow by selecting steps from the menu, including: “Forms”, “Approvals”, “Task lists”, and more. You can build and follow the diagram visually, create loops, and define the sequence of actions for each step.
- Hit Save when you’re done.
When integrated with InvGate Asset Management, workflows can also trigger changes in CI data. For example, during an asset loan, a workflow can automatically update the asset owner or its location based on the request, keeping your inventory accurate without manual updates.