How to set up your service desk for visibility while keeping it secure
Operational Level Agreements (OLAs) are important to define response and resolution expectations between internal teams. They help ensure departments stay aligned and requests move forward without unnecessary delays.

In InvGate Service Management, OLAs are tied to help desks, which makes them especially useful when multiple departments are involved. Configuring them properly ensures that each department knows what’s expected, and you can measure whether those commitments are being met.
#1. Access the OLA settings and define conditions

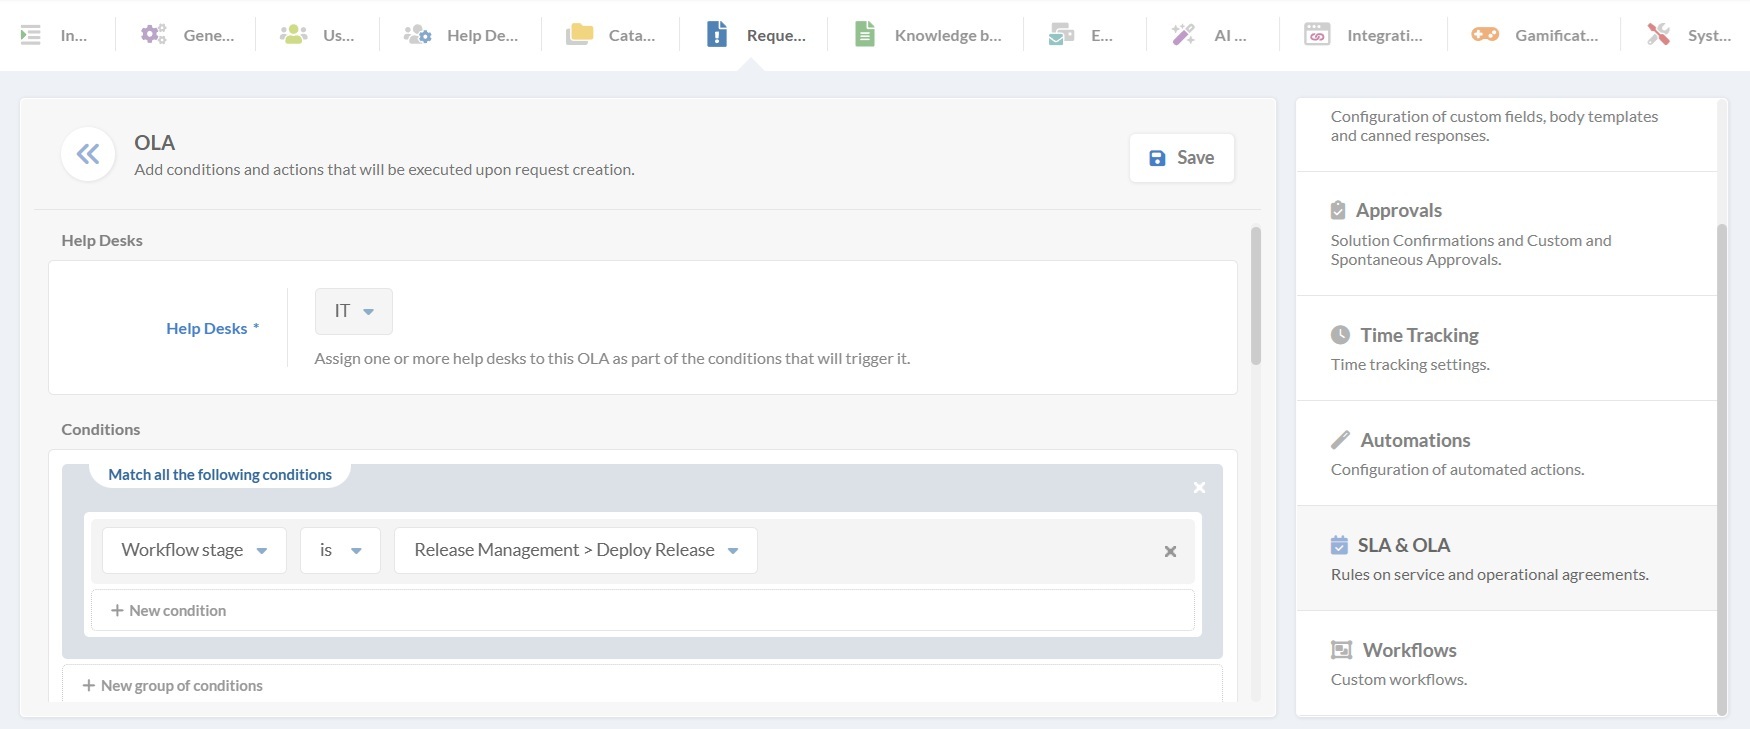
Log in as an administrator and go to Settings > Requests > SLA & OLA. Click Add to create a new OLA.
Because OLAs are centered on help desks, this field is mandatory. Select one or several help desks where the OLA should apply. For example, you might set up one OLA for the HR help desk and another for IT, or a single OLA that covers both.
Next, you’ll define the conditions that determine when an OLA will be triggered. InvGate Service Management offers a wide range of options, such as:
- Category: Apply OLAs depending on the service area (e.g., IT, HR, Facilities).
- Type: Set them for different request types, like Incident, Problem, Change, or Service Request.
- Priority: Adjust the OLA based on urgency.
- Agent or customer: Trigger OLAs depending on who is assigned or who submitted the request.
- Content-based rules: Use information in the subject, description, or even customer sentiment.
- Workflow stage: Apply OLAs to very specific steps in a process, making it possible to measure time spent on key parts of a workflow.
#2. Complete the OLA details
After setting up the conditions, you’ll scroll down to the rest of the configuration and fill in the following fields:
- Subject: Add a clear name for the OLA so it’s easy to identify later.
- Time: Set the expiration time (in minutes, hours, or days).
- Pause according to schedule: Choose if the OLA should pause outside of working hours. You can tie it to the help desk’s schedule, select “None”, or create a custom calendar with shifts and holidays.
- Pause depending on status: Select which request statuses will stop the timer (for example, “Waiting for customer” or “Waiting for external entity”).
- Keep elapsed time: Decide whether the system should preserve the time already spent when an OLA is reapplied.
Here’s how the “Keep elapsed time” option works in practice:
- Same OLA reapplied: Imagine HR is handling a request with a 2-hour OLA. After 30 minutes, the request is reassigned to IT for a separate task. Once IT finishes, the request goes back to HR, and the original OLA applies again. With the “From the same OLA” option enabled, those 30 minutes already spent are preserved. HR now has 90 minutes left to meet their OLA.
- Different OLA applied: A request begins in HR with a 2-hour OLA, but its priority changes, and it switches to IT with a new 3-hour OLA. If “From a different OLA” is selected, the 30 minutes already spent in HR carry over. This way, the total 120 minutes are tracked across both departments.
#3. Add automated actions
Use the Actions section to define what happens as the OLA progresses. Examples include:
- Send a notification to the agent when time thresholds are reached.
- Reassign the request to another help desk if the time is exceeded.
- Change the priority or category automatically.
- Trigger an approval or send an email alert.
- Call a web service for integrations with other tools.
These actions help automate follow-up and keep teams accountable.
Once the fields and actions are set, click Save. The OLA will now apply to requests based on the selected conditions.